Monday

Greek Beet Salad


Beets are an amazing, sweet and tangy superfood which you should definitely include in your everyday diet.
This simple salad uses the whole plant, so you can savor and benefit of all its nutritional value.
Suitable for vegans and fasting.


INGREDIENTS:
 
1 kg/2.25 lb Fresh Beets (beetroots, leaves, stems)
3 tbsp /45 ml Extra Virgin Olive Oil
2 tbsp. white Wine Vinegar (Greek quality is best)
Sea Salt of good quality, to taste
 

Optionally: 1 Mashed Garlic Clove


METHOD:
 
Advice about buying your beets:
Buy your beets very fresh from your local market! How to recognise if they are fresh?  


i. The beetroots’ skin should be firm and smooth.            
ii. The leaves should be bright green, fresh looking, shiny and still upright!
 

A. Prepare the beets for boiling: 

1. Place the beets in the sink. Take one plant, separate the beetroot from its stems and leaves by cutting it off with a sharp knife.

2. Cut the stems in half (they are too long to fit in the pot!). Place them in a strainer.
3. Check the leaves, removing the dry or worn out ones. Place them in the drainer too.
4. Repeat for all beets.
5. If the leaves are too large, you could also cut them in half.
B. Prepare the separated beetroots:
6. Wash them under cold running water.
7. Peel off their skin with a sharp knife.
8. Tip: You can use disposable gloves if you don’t want your hands to be colored red!
9. Peel all beetroots and wash them once more under running water.
10. Look at their beautiful red color! So vivid!!


C. Time for cooking:
 
                   
11. Beetroots need more time to boil so you start with them first.
12. Place the washed beetroots in a deep pot with plenty of boiling water and a bit of salt, over medium heat.
13. Turn down the heat to low and let the beetroots simmer for approx. 20’!!


D. In the meantime, clean the stems and leaves:                              
14. Wash them with cold, running water. Open the leaves and wash them thoroughly, making sure to remove any soil remnants. When washed, place them in a bowl.
15. You can also massage them with your fingers to remove any soil hidden between the leaves. Fyi you can boil and eat the beetroots, leaves AND stems!!
16. The greens may look too many, but they will shrink to ¼ of their original size when boiled.
17. Return the washed leaves and stems into the strainer and shake them to remove excess water.


18. Now wait for the beetroots to boil first!
 

E. Add the leaves and stems:
 

19. After 20’, add slowly all the greens in the boiling water with beetroots.


20. Beetroots should be semi boiled by now!
21. Turn heat to high and use a pierced ladle to press the greens in the boiling water.


22. When the water starts to boil again, reduce the heat to low.  
23. Halfway, stir the greens a bit using a spoon or a pierced ladle.


24. After a total of about 12’, check with a fork if they are done. The stems and beetroots should be pierced through!
25. Remove from the heat, and strain them i.e. shed the hot water.


26. Leave them to drain completely for 5’.
27. Place the boiled beetroots in a platter while still warm.
28. Cut them in rounds with a sharp knife.


29. Beets still keep their beautifully, vivid red color!!
 

F. Serving Suggestions: 
 
30. Before serving, place the greens in a platter and the beetroot rounds all around them.


31. Season with salt, to taste.
32. Drizzle good quality Olive Oil and vinegar on top.
33. Optionally you can add a mashed garlic clove on top also!
34. Our Beet Salad is ready!
35. Beet Salad can be served warm or at room temperature.
36. You can store the boiled beet Salad in the fridge (covered) for up to 1 week.
37. Here is the amazing Beet Salad! Beautiful, delicious and so good for you!


38. Here Beet Salad is served for lunch, with koulouri, Spinach pie, fresh bread, Graviera cheese and Russian Salad!


39. This is the taste of the fertile Greek land in a plate! A-M-A-Z-I-N-G!
 

G. Info about Beets and Nutritional Value:
 
Beets are a beloved green in Greece but also all over the world because they are considered a superfood. Beets can be eaten raw in salads, boiled or can be used in a smoothie or juice.
Beets are loaded with vitamins and minerals and are low in calories and fat. They contain a high concentration of nitrates, which have a blood pressure-lowering effect. This may lead to a reduced risk of heart attacks, heart failure and stroke.

Slow roast Greek style leg of lamb


This slow roast Greek style leg of lamb is rich and flavorsome, and simply melts in your mouth. Not only does it make an amazing family meal, it’s perfect for a special occasion such as birthday meals and Easter. Just add fresh vegetables or a salad, and don’t forget the potatoes. 


Ingredients

  • leg of lamb
  • 2 cups Greek style natural yoghurt
  • 4 tablespoons extra virgin olive oil
  • 5 tablespoons of dried oregano
  • 5 large cloves garlic, crushed
  • juice and zest of one lemon
  • 1 tablespoon ground cumin
  • 2 teaspoon sea salt
  • 2 teaspoon freshly ground black pepper.
  • 2 large freezer bags
 for the cucumber and tomato salad with tzatziki dressing
  • 4 ripe tomatoes, roughly chopped
  • 2 Lebanese cucumbers, peeled and roughly chopped
  • 1 200g tub tzatziki
  • sea salt and black pepper to taste
  • ¼ cup packed torn mint leaves
 to serve
  • warmed pita or flat bread
  • red onion slices and mint leaves to garnish

 Preparation 

 In a bowl mix all the marinade ingredients thoroughly. Cut several deep cuts in the lamb leg and place it in 2 freezer bags (one inside the other). Add the marinade, seal the bag and then massage the marinade into the cuts in the lamb and all over the leg. Place in the fridge to marinate for at least 4 hours or even overnight. This enhances the flavours and allows the yoghurt to acts tenderise the meat.
Preheat the oven to 170°C.
Transfer the lamb from the marination bags with the marinade to a large roasting tray with enough water the just cover the bottom of the tray. (The water stops the meat juices and marinade from burning on the bottom of the tray and ensures the meat stays moist while it roasts). Cover the leg with baking paper and foil and bake covered for about 3.5 hours occasionally basting with the juices and adding a little more water to the roasting tray if required. Remove the foil and paper for the last hour of cooking to allow the meat to brown. The lamb is ready when the meat is tender and falling off the bone. Remove the meat from the oven, cover and allow to rest for about 20 minutes.
To make the rustic tomato and cucumber salad, just tumble all the ingredients in a bowl, add the torn mint leaves and season to taste. Serve the lamb scattered with red onion slices and torn mint leaves with the salad and warmed Turkish bread, or pita bread. Serves 6.


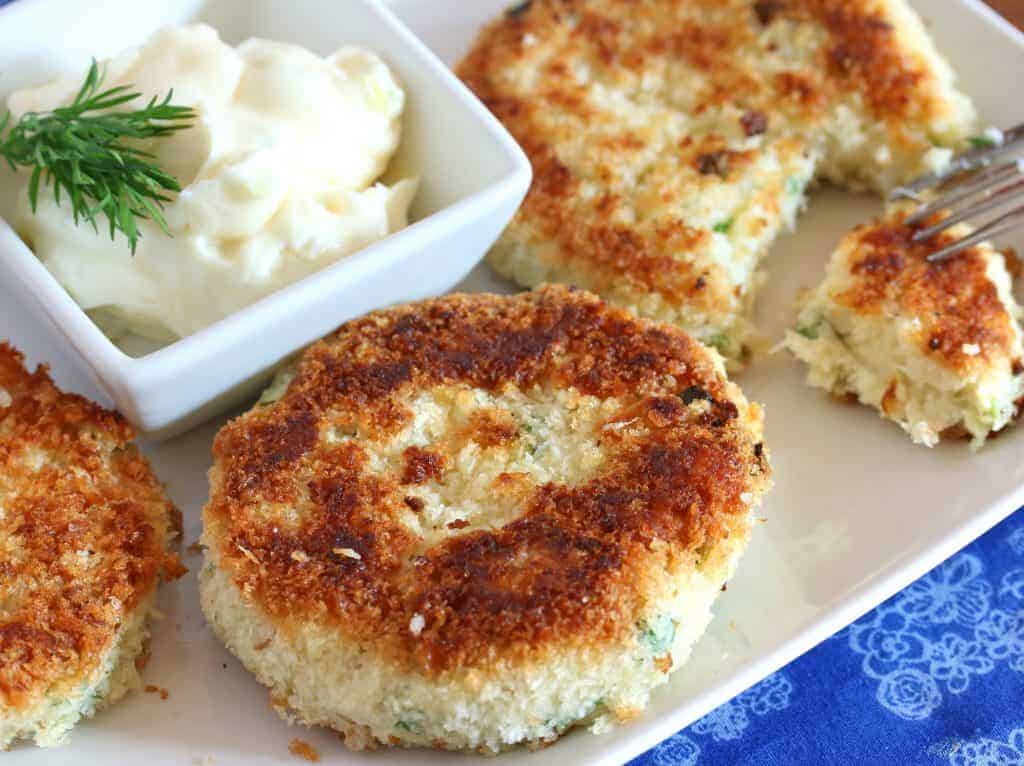
Fresh Cod Cakes

Image result for Fresh Cod Cakes


Traditional fish cakes are made with salt cod and potatoes. To create a lighter, more delicate cake, we used fresh cod and left out the potatoes.


Ingredients

    • 5 slices firm white sandwich bread
    • 1 large celery rib, cut into 2-inch pieces
    • 2 scallions, cut into 2-inch pieces
    • 1/4 cup loosely packed fresh flat-leaf parsley
    • 1 lb skinless cod fillet, any bones removed and fish coarsely chopped
    • 1 large egg, lightly beaten
    • 1/2 teaspoon salt
    • 1/4 teaspoon black pepper
    • 3 tablespoons vegetable oil
    •  ccompaniment: tartar sauce and lemon wedge

Preparation

    1. Tear bread into pieces and pulse to fine crumbs in a food processor. Transfer a scant cup of crumbs to a bowl for fish cakes and reserve remaining 1 1/2 cups in a shallow bowl for coating. Pulse celery and scallions in processor until coarsely chopped, then add parsley and pulse until finely chopped. Combine celery mixture with scant cup crumbs in bowl (for fish cakes).
    2. Pulse fish in processor until finely chopped (be careful not to process to a paste). Add fish to celery-crumb mixture along with egg, 1/4 teaspoon salt, and 1/8 teaspoon pepper, stirring until combined well.
    3. Season bread crumbs in shallow bowl with remaining 1/4 teaspoon salt and 1/8 teaspoon pepper. Gently shape fish mixture into 4 (4-inch) patties (mixture will be soft) and coat well with seasoned bread crumbs. Chill, uncovered, on a wax-paper-lined large plate 10 minutes.
    4. Heat 1 1/2 tablespoons oil in a 12-inch nonstick skillet over moderate heat until hot but not smoking, then fry 2 fish cakes, turning over once, until golden brown and cooked through, 8 to 10 minutes total. Repeat with remaining 1 1/2 tablespoons oil and 2 fish cakes, wiping out skillet with a paper towel between batches.

Thursday

Σπανακόπιτα χωρίς φύλλο

Greek Lemony Roasted Baby Potatoes

Ρυζόγαλο... για πρόταση γάμου!!

Foolproof Roasted Turkey - How To Make Perfect Roast Turkey

Thanksgiving Roasted Turkey(Γαλοπούλα)

Greek Turkey Stuffing

Γαλοπούλα γεμιστή | Συνταγή του Λευτέρη Λαζάρου


ΥΛΙΚΑ
  • Για τη γέμιση
  • 1kg μοσχαρίσιο κιμά
  • 100ml ελαιόλαδο
  • 150g ρύζι
  • 130g ψιλοκομμένο κρεμμύδι
  • 2 ψιλοκομμένες σκελίδες σκόρδο
  • 150ml μπίρα
  • 150ml λευκό κρασί
  • 50ml λικέρ αμαρέτο
  • 10 τεμ. αποξηραμένα βερίκοκα, κομμένα σε μικρά καρέ
  • 10 τεμ. κάστανα βρασμένα, καθαρισμένα και σπασμένα σε κομμάτια
  • 60g καβουρδισμένο κουκουνάρι
  • ½ ματσάκι ψιλοκομμένο μαϊντανό, μόνο τα φύλλα
  • ξύσμα από 1 λεμόνι
  • ξύσμα από 1 πορτοκάλι
  • 60g ψιλοκομμένο σέλερι
  • Για τη γαλοπούλα
  • 1 γαλοπούλα για 6 – 8 μερίδες
  • 8 κλωνάρια θυμάρι
  • 15g αλάτι
  • 3g πιπέρι
  • 60g μέλι
  • 500ml ζωμό λαχανικών ή νερό
    ΟΔΗΓΙΕΣ ΠΡΟΕΤΟΙΜΑΣΙΑΣ
    Για τη γέμιση
    Σε μία κατσαρόλα ζεσταίνετε το ελαιόλαδο σε μέτρια προς δυνατή φωτιά και σοτάρετε το κρεμμύδι για περίπου 2-3 λεπτά. Προσθέτετε το σκόρδο και τον κιμά και συνεχίζετε το σοτάρισμα για άλλα 8-9 λεπτά ανακατεύοντας συνεχώς. Αφού ο κιμάς ασπρίσει, προσθέτετε το ρύζι, τα κάστανα, τα βερίκοκα, το κουκουνάρι, το σέλερι και το μαϊντανό. Σβήνετε το μείγμα αρχικά με τη μπίρα και αφού εξατμιστεί, σβήνετε και με το κρασί, το οποίο αφήνετε επίσης, να εξατμιστεί. Προσθέτετε το αμαρέτο και αποσύρετε την κατσαρόλα από τη φωτιά. Ανακατεύετε στο μείγμα το ξύσμα λεμονιού και πορτοκαλιού, αλατοπιπερώνετε και αφήνετε τη γέμιση να κρυώσει πάρα πολύ καλά.
    Για τη γαλοπούλα
    Καθαρίζετε το λαιμό και τις φτερούγες από το περιττό λίπος. Αλατοπιπερώνετε την κοιλιά της γαλοπούλας και προσθέτετε με ένα κουτάλι τη γέμιση. Ράβετε με κλωστή ψησίματος το λαιμό και την κοιλιά και στερεώνετε τα πόδια με τέτοιο τρόπο, ώστε να εφάπτονται στον κορμό. Στη συνέχεια αλατοπιπερώνετε και την εξωτερική επιφάνεια της γαλοπούλας και την αλείφετε ολόκληρη με το μέλι. Έπειτα την τοποθετείτε σε ένα ταψί με 3 ποτήρια νερό ή ζωμό λαχανικών και τα κλωνάρια από θυμάρι. Ψήνετε σε προθερμασμένο φούρνο, αρχικά στους 230ο C για 45 λεπτά και στη συνέχεια στους 130ο– 140οC για άλλες 4-5 ώρες. Υπολογίζετε το χρόνο σας έτσι, ώστε η γαλοπούλα σας να είναι έτοιμη 1 ώρα πριν το γιορτινό σας τραπέζι. Προτείνεται να χρησιμοποιήσετε ένα θερμόμετρο μαγειρικής και να ελέγξετε τη θερμοκρασία στο κέντρο της γαλοπούλας, ώστε να είναι 70ο C. Το ζουμί από τα υγρά της γαλοπούλας που θα μαζευτεί στο ταψί, δεν το πετάτε, αλλά το χρησιμοποιείτε ως βάση για να φτιάξετε μία ωραία σάλτσα.

Γαλοπουλα γεμιστη παραδοσιακη


 ΥΛΙΚΑ

Για τη γέμιση
  • 1 κ.σ. ελαιόλαδο
  • 1 κρεμμύδι
  • 1 κ.σ. θυμάρι
  • 2 στικ σέλερι
  • 200 γρ. μπέικον
  • 1 κόκκινο μήλο
  • 1 σκ. σκόρδο
  • 200 γρ. κάστανα βρασμένα
  • 1 κύβο μανιταριού
  • 200 γρ. νερό
  • 1 κ.σ. βούτυρο
Για τη γαλοπούλα
  • 2 ½ κιλά γαλοπούλα
  • 150 γρ. βούτυρο
  • αλάτι
  • πιπέρι
  • 2 κ.σ. ελαιόλαδο
  • 1 φέτα πορτοκάλι
  • 3 κλ. δεντρολίβανο
Για το σερβίρισμα
  • 4 μήλα κόκκινα
  • 1 κ.σ. ζάχαρη κρυσταλλική
  • 50 γρ. βούτυρο
  • 1 κλ. δεντρολίβανο
  • 1 κ.σ. μέλι
  • αλάτι
  • 20 γρ. κονιάκ

Μέθοδος Εκτέλεσης

Για τη γέμιση
  • Τοποθετούμε ένα τηγάνι σε δυνατή φωτιά και βάζουμε 1 κ.σ. ελαιόλαδο.
  • Ψιλοκόβουμε το κρεμμύδι και το βάζουμε στο τηγάνι. Προσθέτουμε θυμάρι και σοτάρουμε.
  • Ψιλοκόβουμε το σέλερι και το βάζουμε στο τηγάνι.
  • Προσθέτουμε το μπέικον και το μήλο σε κυβάκια, το σκόρδο κομμένο σε φέτες, τα κάστανα και σοτάρουμε.
  • Ρίχνουμε τον κύβο μανιταριού, το νερό, το βούτυρο και βράζουμε για 5 λεπτά.
  • Αφαιρούμε από τη φωτιά και αφήνουμε να κρυώσει.
Για τη γαλοπούλα
  • Προθερμαίνουμε τον φούρνο στους 180ο C στον αέρα.
  • Σηκώνουμε προσεκτικά το δέρμα και βάζουμε ανάμεσα το βούτυρο σε κομμάτια. Πασπαλίζουμε με αλάτι, πιπέρι, ελαιόλαδο και απλώνουμε σε όλη την επιφάνεια της γαλοπούλας.
  • Βάζουμε τη γέμιση με ένα κουτάλι και καλύπτουμε με τη φέτα από το πορτοκάλι για να μην καεί κατά τη διάρκεια του ψησίματος.
  • Δένουμε τα πόδια της γαλοπούλας με έναν σπάγγο. Τη μεταφέρουμε σε λαδόκολλα, βάζουμε το δεντρολίβανο και την τυλίγουμε καλά με τη λαδόκολλα και αλουμινόχαρτο.
  • Μεταφέρουμε σε ταψί με σχάρα και ψήνουμε για 2 ½ ώρες. Ξεσκεπάζουμε και ψήνουμε επιπλέον 30 λεπτά.
Για τη γαρνιτούρα
  • Τοποθετούμε ένα τηγάνι σε δυνατή φωτιά.
  • Κόβουμε τα μήλα σε τέσσερα κομμάτια και αφαιρούμε τα κουκούτσια. Τα βάζουμε στο καυτό τηγάνι και σοτάρουμε 1-2 λεπτά μέχρι να πάρουν χρώμα.
  • Προσθέτουμε τη ζάχαρη και αφήνουμε 2-3 λεπτά για να καραμελώσουν τα μήλα.
  • Βάζουμε το βούτυρο και μόλις αρχίσει να λιώνει προσθέτουμε το δεντρολίβανο, το μέλι, αλάτι, το κονιάκ και ανακατεύουμε.
  • Αφήνουμε 2-3 λεπτά να εξατμιστεί το κονιάκ και σερβίρουμε.

Γαλοπούλα γεμιστή


Wednesday

Καταιφι

 1

Tο κανταΐφι,  είναι ένα από τα πιο αγαπημένα σιροπιαστά γλυκά και παραδοσιακά δεν λείπει σχεδόν ποτέ από τα εορταστικά τραπέζια. Στην πραγματικότητα είναι ένα εύκολο γλυκό που μπορεί ο καθένας να το φτιάξει, αντί να το αγοράσει και αν δεν το έχετε τολμήσει μέχρι σήμερα, ίσως ήρθε η ώρα να εντυπωσιάσετε τους καλεσμένους σας με αυτή την εκπληκτική αγιορείτικη εκδοχή του.


Με αυτή την αγιορείτικη συνταγή θα φτιάξετε εκπληκτικό κανταΐφι, το πιο νόστιμο κανταΐφι που έχετε δοκιμάσει ποτέ!

 Μαζί με τη γέμιση βάζουμε πάντα ένα κομμάτι φρέσκο βούτυρο. Και από πάνω το περιχύνουμε και πάλι με λιωμένο βούτυρο, το κανταΐφι δεν θέλει τσιγκουνιές!»

Τα υλικά που θα χρειαστούμε για το αγιορείτικο κανταΐφι είναι:

1 κιλό κανταΐφι
1/2 κιλό καρύδια ψίχα τριμμένη
1/2 κιλό αμύγδαλα ψίχα τριμμένη
2-3 φρυγανιές τριμμένες
1 φλυτζάνι του τσαγιού ζάχαρη
2 μοσχοκάρυδα τριμμένα
7 ασπράδια αυγών
100 γρ. φουντούκι ψίχα προαιρετικώς
Λίγη κανέλα σκόνη
1/2 κιλό βούτυρο (περίπου)

Για το σιρόπι:

2 φλυτζάνια του τσαγιού μέλι
6 φλυτζάνια του τσαγιού ζάχαρη
5 φλυτζάνια του τσαγιού νερό
Κανέλλα ξύλο
Χυμό δύο λεμονιών

Επί το έργον:

Χτυπάμε τα ασπράδια μαρέγκα και ανακατεύουμε σ’αυτή όλα τα υλικά. Κατόπιν ξαίνουμε το κανταϊφι, τυλίγουμε με λίγη γέμιση και τα τοποθετούμε κοντά  κοντά σε βουτυρωμένο ταψί. Ραντίζουμε με λίγο νερό, ζεματίζουμε με το βούτυρο και ψήνουμε σε μέτριο φούρνο από 1/2 ώρα έως 3/4 προσέχοντας μόνο να ροδίσουν (χρησιμοποιούμε κατά περίπτωση λαδόκολλα). Όταν κρυώσουν λίγο περιχύνουμε με το σιρόπι που ήδη έχουμε βράσει (καυτό) και τα σκεπάζουμε.

Μπορεί να γίνει και στρωτό στο ταψί με μισό κανταϊφι από κάτω και μισό από πάνω και στη μέση η γέμιση.

Επίσης, μπορούμε να στρώσουμε από κάτω 2-3 φύλλα κρούστας στη μέση η γέμιση και από πάνω 2-3 φύλλα. Βρέχουμε με λίγο νερό ραντίζοντας και χαράζουμε βαθειά με κοφτερό μαχαίρι, σε τρίγωνα.

Από το βιβλίο ΚΑΛΟΓΗΡΙΚΗ ΜΑΓΕΙΡΙΚΗ & ΖΑΧΑΡΟΠΛΑΣΤΙΚΗ,  Αρχιμανδρίτου Δοσιθέου, Ηγούμενου της Ιεράς Μονής Τατάρνης.

Πηγή:monastiriaka

Monday

Zucchini and Feta Fritters

Zucchini and Feta Fritters 

These plump, pan-fried fritters are perfect for early fall, when fresh zucchini is in abundance. Serve warm or at room temperature.


Equipment


  • Colander
  • Large Bowl
  • Spatula
  • Large Baking Sheet
  • Paper Towels
  • Large, Heavy Skillet
  • Spoon
  • Slotted Spoon or Spatula


 Ingredients


  • 3 medium zucchini, coarsely grated (4 cups)
  • 4 large eggs, beaten
  • ½ cups plus 2 Tbsp. all-purpose flour
  • 3 medium scallions, finely chopped (⅓ cup
  • ¼ cup finely chopped fresh dill
  • 2 large garlic cloves, minced (1 tsp.)
  • 1 tsp. ground coriander
  • ½ tsp. sweet paprika
  • Freshly ground black pepper
  • 5 oz. Greek feta, crumbled (1 cup)
  • Olive oil or sunflower oil, for frying
  • Greek plain yogurt, for serving
  • Lemon wedges, for serving


 Instructions


  1. Set a colander in the sink and add the zucchini. Sprinkle 1 teaspoon kosher salt over the zucchini, toss gently to combine, and let rest to drain the liquid for 30 minutes. Then use your hands to squeeze out and discard any remaining liquid.
  2. In a large bowl, add the zucchini, eggs, flour, scallions, garlic, dill, coriander, and paprika, and mix well with a spatula. Add ½ teaspoon salt, a generous pinch of black pepper, and the crumbled feta, and fold in gently to incorporate without breaking up the feta too much.
  3. Set the batter by the stove. Line a large baking sheet with paper towels, and set it by the stove as well. In a large, heavy skillet over medium-high heat, add enough oil to reach ¼ inch up the sides. Once hot and just barely beginning to smoke, spoon a few 2-tablespoon-size scoops of batter into the oil (avoid overcrowding). Lightly press each fritter down with the back of a spoon, flattening it slightly. Cook, turning once, until the fritters are golden and crisp on both sides, 5–6 minutes total.
  4. Use a slotted spoon or spatula to transfer the cooked fritters to the lined baking sheet. Continue cooking the rest of the batter. Serve warm or at room temperature, with labneh and lemon wedges.

Cretan Fried Cheese Pastries (Sarikopitakia)


These savory fried cheese pies are named for their spiral shapes. Sariki, a Turkish word meaning “turban,” is also the name of a traditional headdress still worn by Cretan men at celebrations. Tsikoudia, a grape-based spirit from Crete, is used in the dough, likely for making it easier to roll out into thin sheets.


What You Will Need


  • Mixer
  • Dough Hook
  • Rolling Pin
  • Pizza Cutter
  • Cast-Iron Skillet
  • Wire Rack


Yield: makes 12 Pastries
Time: 1 hour, 30 minutes


Ingredients

  • 4 cups all-purpose flour, plus more for dusting
  • 3 tbsp. tsikoudia or grappa
  • 2 tbsp. olive oil, plus more for frying
  • 1⁄2 tsp. kosher salt
  • 1 lb. mizithra cheese (2 cups), or substitute 11 oz. ricotta salata (1½ cups) blended with 5 oz. feta (½ cup)
  • Thyme honey, for serving


Instructions

  1. In the bowl of a stand mixer fitted with a dough hook, combine the flour, 1 cup water, the tsikoudia, olive oil, and salt. Mix on low speed until a dough forms, then increase to second speed and continue mixing until the dough is tight and smooth, 3–4 minutes. Cover the bowl with plastic wrap and let rest 30 minutes.
  2. On a lightly dusted work surface, roll the dough out to a 36x15-inch rectangle. Using a pizza cutter or sharp knife, cut the dough into twelve 3x15-inch strips. Spread 3 generous tablespoons of cheese filling along one long side of each strip, then roll up the dough from that side to seal in the filling, creating a long cylinder. Roll up each cylinder along the work surface to form a coil, then tuck the loose outer ends under and press lightly to flatten and seal.
  3. Set a wire rack over a baking sheet and place it by the stove. In a large (12-inch) cast-iron skillet, add enough olive oil to reach about 1 inch up the sides of the pan. Heat the oil over medium-high heat until a deep-fry thermometer reads 325°. Fry the sarikopitakia in batches, flipping them occasionally with a slotted spoon or spatula, until golden and crispy, about 8 minutes.
  4. Transfer the pastries to the wire rack to drain. Serve warm, drizzled with thyme honey to taste.